How to set automatic WiFi shutdown at night on Huawei router
Some people have a tendency of turning off their home WiFi network at night and turning it on again in the morning.
Some do it as a way to cut down the prolonged exposure to EMF (electromagnetic field) radiation. Even when the WiFi is not in use, the router keeps sending out radio waves, searching and trying to connect to the electronic devices in its vicinity. Long-term exposure to electromagnetic radiation is associated with some health risks and thus reducing it is attributed to have some health benefits.
Some people argue that it is not necessary to have the WiFi on while they do not need to use it. Others believe that turning off the router at night can extend its lifespan and thus much more appropriate to turn it off.
Others turn off the WiFi to discipline themselves and their children to strictly spend their nighttime sleep with no Internet distractions. With much that happens on the web and especially on social media, one can spend the entire night just scrolling or binge-watching random videos. With the Internet switched off, the distractions from sleep are minimized.
For whichever reason, if you usually turn off the home WiFi at night, you most likely do it by switching off the router at the power source or unplugging its power cord.
This may not be as effective as you may want it as sometimes you may forget to turn it off or to turn it on again in the morning. This could also be too much to add to your already bloated daily routine.
Luckily, many routers have a feature that allows setting the WiFi network to automatically turn off at a specified time and turn itself on again at a certain time. In this article, I will guide you on how to set up automatic WiFi shutdown at night on the Huawei Echolife HG8546M router.
Turning WiFi off automatically at a specific time on the Huawei Echolife router
Follow the steps below:
Step 1: Connect your device to your network either via WiFi or ethernet cable.
Step 2: Log in to your router's management web interface. To do so, open your web browser and type the router's default IP address 192.168.100.1 in the address bar then hit enter. The login page will open with the Account and Password fields.
There are two levels of access to the router interface:
- The admin access with the Account/username as telecomadmin and the default password as admintelecom.
- The user access with the Account/username as root and the default password as adminHW.
If you have ever changed the password before, then you use that instead. For this specific setting, you need to log into the router interface as the administrator. So use the admin access credentials and hit the Login button.

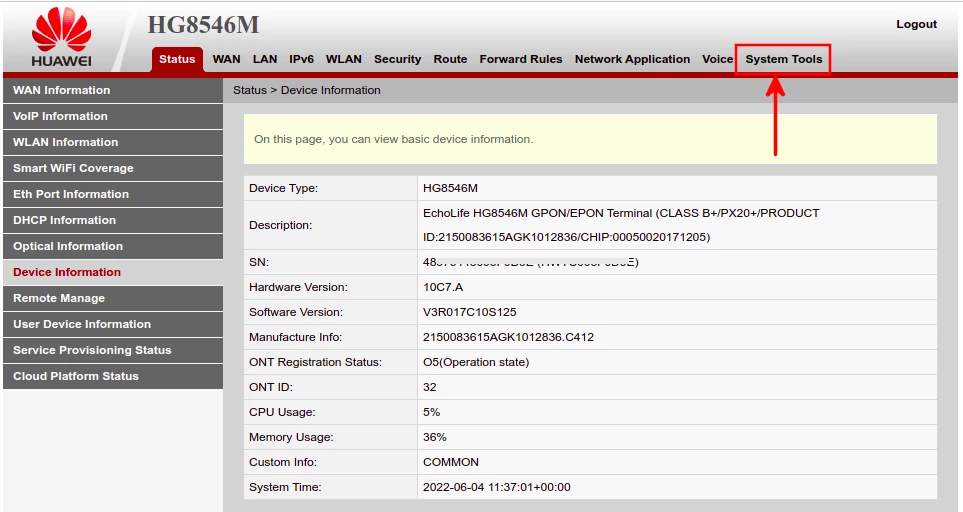
Step 3: The router interface will open on the status page with the device(router) information. As you can notice, the System time at the bottom of the device details table will most probably be different from the actual time. This is because the time shown there is the GMT time and will differ from yours depending on the time difference between your timezone and GMT. In my case, the time shown is 3hrs behind the current time.
Therefore you will need to change the time setting to your timezone.
Click on the System Tools option in the top menu.
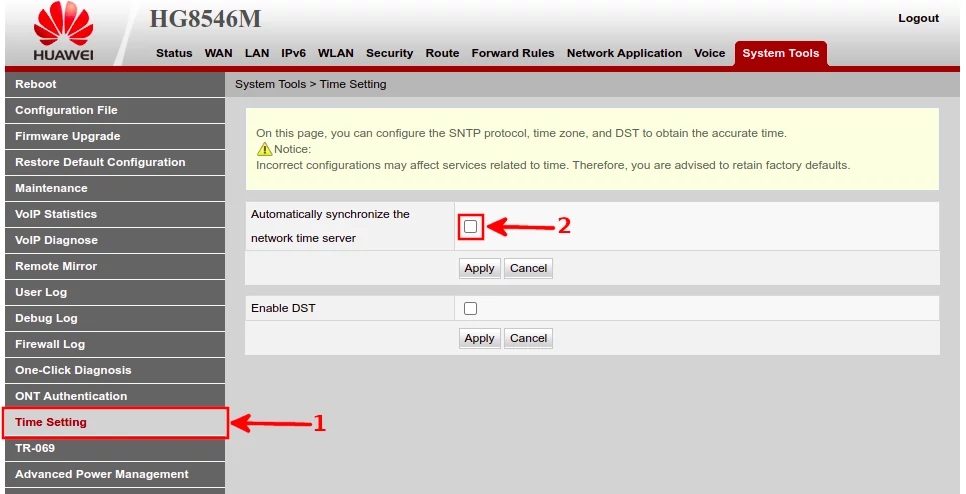
Step 4: While on the System Tools page, open the Time Setting tab and then check/tick the Automatically synchronize the network time server checkbox.
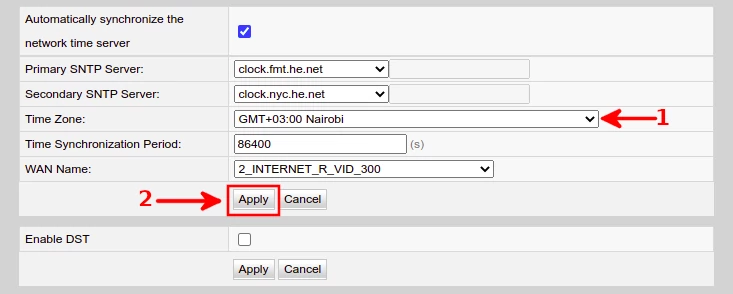
Step 5: Select your country's timezone from the Time Zone dropdown select options. Leave everything else as is and then click on the Apply button to save the changes.
Step 6: Click on the WLAN option in the top menu and then navigate to the Automatic WiFi Shutdown tab from the left menu. You will be presented with an interface with 4 entries each with an option for the 7days of the week as shown below. In case it is not as shown below, make sure to check/tick the "Enable Automatic WiFi Shutdown" checkbox.
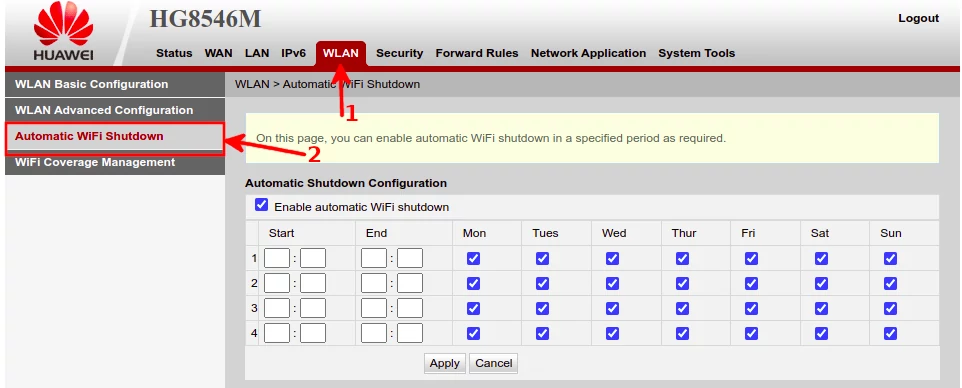
Step 7: Set the time the WiFi network should be off. Under the Start table column enter the time the WiFi should shut down. The first box is the hour in 24hr system while the second is the minutes. Under the End column, enter the time the WiFi should turn on in the same format. By default, all the 7 days of the week are checked so the WiFi shutdown you set will apply on each day when that time comes.
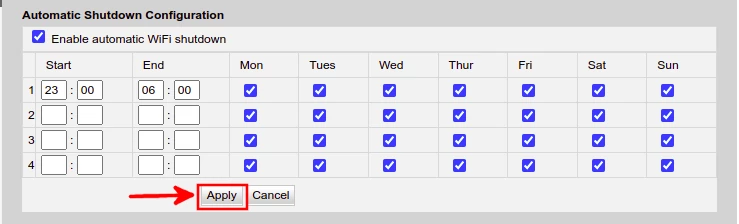
For instance, I have set it below to turn off exactly at 11 pm and to turn on again at 6 am.
If you want the shutdown to only apply on some specific days and not to apply on others, then uncheck those for which you don't want to apply.
You can set more than one automatic shutdown (up to 4 times a day). In case you want to have the WiFi also shut down at a different time, just add it as another entry.
Once done, click on the Apply button to save the changes.
That's it!
The changes will be applied and the WiFi turned off and on again when the specified times reach.
Note: In case the WiFi has shut down as scheduled but you really need to use it at that specific time, you can connect your PC to the router via ethernet cable and extend the WiFi time.